¶ Overview
Now that we have the linear rails and motors installed, we can build and attach the bed.
¶ Hardware
¶ Purchased Parts
- LayerFused X301 Frame Kit
- (3) 300mm 2020 Aluminum extrusion
- X301 Heated Bed Kit MK2A 300mmx300mm 24V with Heavy Duty Mosfet
- (1) 3D Printer Heat Bed Mk2a or CR-10 24v
- (4) Silicone Leveling Column
- (1) Heated Bed Mosfet (Optional but highly recommended)
- (1) Dual Sided PEI Build Plate (Optional but recomended)
- (20) M5 8mm Socket Head Screws
- (20) M5 T-Nuts
¶ Printed Parts
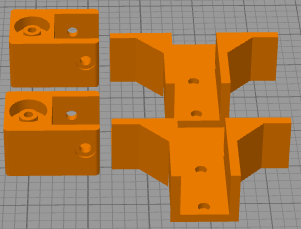
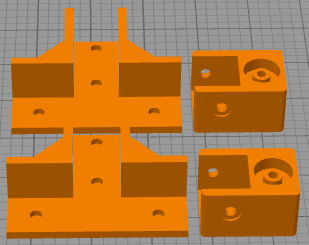
- (4) Bed Brackets
- (4) Bed Mounts (or CR-10S Version)


[Insert picture with 4 Bed Brackets]
¶ Mods to Consider
- 6+2 Point Heated Bed Frame - Requires additional hardware. This mod by johanmalay improves the rigidity of the heated bed by increasing the points of contact it has with the frame from 4 to your choice of 6 or 8.
- Lighted Bed needs to replace 2 bed mounts with specially designed left and right brackets. Alternatively, johanmalay created an Extended Lighted Bed Mounts Mod which allows you to add more lights and/or raise them higher.
¶ Video
¶ Instructions
¶ Bed Frame
Start with the 2 bed brackets. These are 3D printed parts for attaching the bed frame parts together. Using M5 8mm screws with Tnuts prep the 3D printed parts. Next slide the 2020 extrusion onto the bed bracket. There should be ~110mm of extrusion on each side of the 3D printed part. Once you have both brackets attached to the extrusion we add the crossbar the bed frame. Once everything is tightened up and even, slide the bed frame into the screws and Tnuts on the Z carriage bracket. This part will take some patience and wiggling. There is very little tolerance between these 2 parts, if everything is aligned properly the bed frame will slide onto the brackets. Once the bed frame is in tighten the screws to the bed frame on the Z bracket mounts.
¶ Bed Mounts
There are 2 different types of Bed Mounts for this build. If you choose to install neopixels or may decide later you can use the Lighted Bed mounts. They connect to the bed frame the same way. Using 2 M5 8mm screws with Tnuts slide the bed mounts onto the end of the extrusion. Tighten the screws to the bed frame.
In each corner of the bed mounts is a space for the silicon leveling column. Place one in each of the bed mounts. Lay the heated bed ontop of the silicon leveling columns. Secure the heated bed to the frame using M3 panhead screws with either Tnuts or adjustment knobs.
Previous Step Back to Guide Next Step