¶ ADXL345
Setting up an adxl345 for Input Shaper on X301
¶ Getting Started
While not required Input Shaper is a great tool to help with printing faster and getting rid of "Ringing" or "Ghosting" in your prints. With Klipper you have the ability to add multiple controllers
¶ What you need
1 X Female Dupont to Tinned 6 Pin 24awg found here
or 1 x Female Dupont to Male Dupont 6 Pin 24awg found here
1 x adxl345 which you can obtain from here
1 x raspberry pi or other mcu of your choice.
∞ x patience
¶ Setup
¶ Software
It is probably a good idea to start by setting up your software. Start by making backups or copies of your printer configuration file. There are a couple prerequisites before you can successfully connect the adxl to klipper. These dependencies are not installed by default on most operating systems.
If you plan to use your Klipper Host as a secondary MCU you will need to install the klipper mcu start script. The Klipper MCU has to start before the klippy service otherwise it will not work properly. To install the script the following commands are needed.
cd ~/klipper/
sudo cp "./scripts/klipper-mcu-start.sh" /etc/init.d/klipper_mcu
sudo update-rc.d klipper_mcu defaults
The first thing you will need to install is numpy. This may take a bit on your raspberry pi, this is normal.
~/klippy-env/bin/pip install -v numpy
Next to install the remaining dependencies for numpy run the following command
sudo apt install python-numpy python-matplotlib
At this point you have the software requirements to run Input Shaper on Klipper via the Raspberry Pi.
Next we need to make sure that we have the Raspberry Pi setup to be a secondary MCU for Klipper. Building the Linux Process Controller code is the next step in the setup process.
cd ~/klipper/
make menuconfig

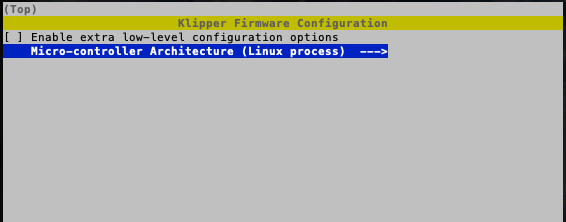
You should be presented with a screen that looks similar to the one pictured above. Select Micro-controller Architecture, and select the Linux Process option. Exit and save. Next you will need to build and install the newly created micro controller code. To accomplish this enter the following commands:
sudo service klipper stop
make flash
sudo service klipper start
¶ Hardware connection
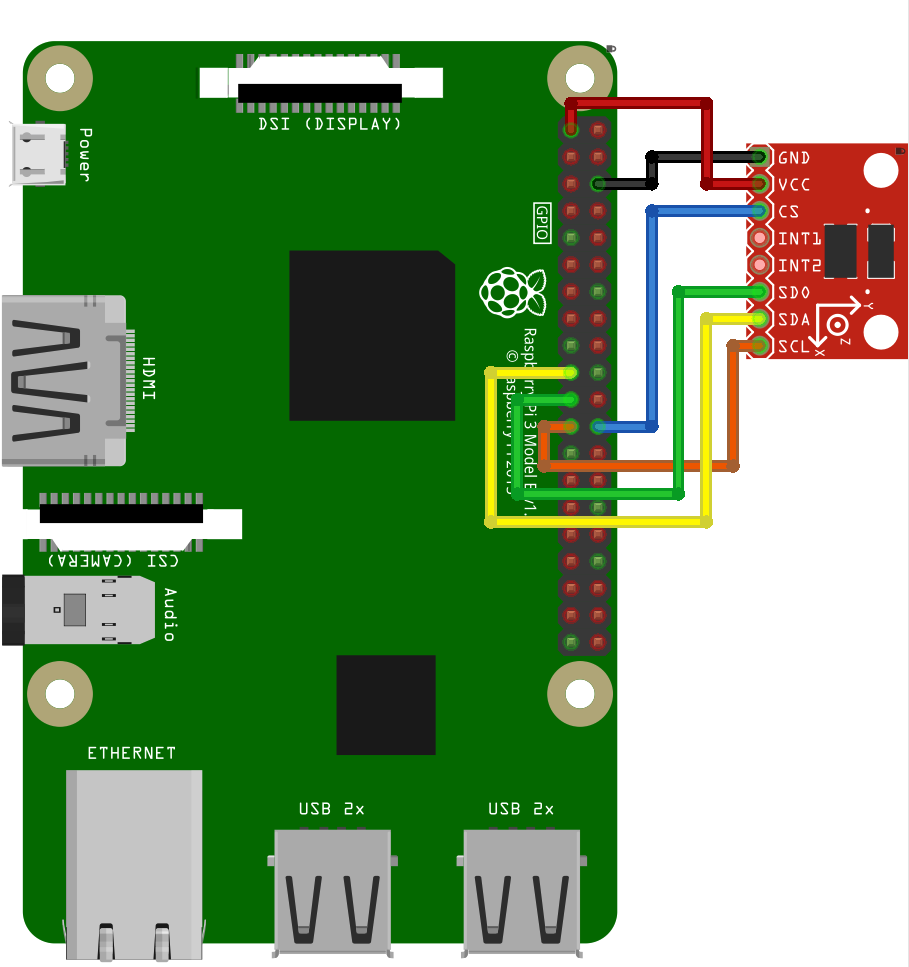
To connect the ADXL to your Raspberry Pi you will need 6 female to female dupont jumper cables. Of course the connection of these cables is going to vary depending on the hardware that you are using as your secondary MCU. For our purposes we are going to be using a Raspberry Pi which is also the Klipper host. We will be connecting the ADXL345 to the RPi via an SPI connection.
| ADXL345 Pin | RPi Pin | RPi Pin Name |
|---|---|---|
| 3V3 (or VCC) | 01 | 3.3v DC power |
| GND | 06 | Ground |
| CS | 24 | GPIO08 (SPIO_CEO_N) |
| SDO | 21 | GPIO09 (SPI0_MISO) |
| SDA | 19 | GPIO10 (SPI0_MOSI) |
| SCL | 23 | GPIO11 (SPI0_SCLK) |
(ADXL345 -> RPi from Fritzing)

¶ Testing
There are a couple lines that need to be added to your printer configuration file before you can start testing and using the accelerometer. On the Raspberry pi you will need to make sure that the SPI driver is enabled. To do this execute sudo raspi-config and navigate to the "Interfacing Options" menu and ensure that SPI is enabled.
Once this has been verified you will need to add the following to your printer configuration:
[mcu rpi]
serial: /tmp/klipper_host_mcu

[adxl345]
cs_pin: rpi:None

[resonance_tester]
accel_chip: adxl345
probe_points:
    150,150,20  # X301 example
Save the config and restart Klipper.
To verify connectivity to the ADXL from Klipper issue the ACCELEROMETER_QUERY command from the terminal.